Puppet Configuration Management Tool
Puppet is a renowned configuration management tool that plays an integral role in the DevOps world. By defining infrastructure as code, Puppet allows system administrators and developers to manage computing resources, ensuring consistency, repeatability, and scalability across deployments.
Intro to Puppet
Puppet, initially developed by Luke Kanies in 2005, pioneered the “infrastructure as code” philosophy. Puppet allows system administrators and developers to describe the desired state of their infrastructure through a declarative language. By doing so, they can ensure consistency, repeatability, and scalability across various deployments. Serving both small-scale setups and sprawling enterprise environments, Puppet automates the provisioning and management of infrastructure, thereby streamlining administrative tasks and minimizing the risk of human-induced errors.
Puppet Quick Facts
- Inception Date: Puppet was introduced to the DevOps landscape in 2005, marking it as one of the pioneers in configuration management tools.
- Popularity: Puppet is used by over 40,000 organizations globally, including both startups and Fortune 100 companies.
- Extensibility: Puppet Forge, the module marketplace for Puppet, houses over 7,000 community-contributed modules, showcasing the tool’s vibrant community and the ecosystem’s commitment to shared tooling and extensions.
- Scaling Capabilities: Puppet boasts the ability to manage infrastructure setups that range from just a few nodes to massive deployments of over 50,000 nodes, making it scalable for organizations of all sizes.
- Broad Platform Support: Puppet offers support for multiple platforms and environments, including major operating systems like Windows, Linux, and macOS, as well as cloud platforms like AWS, Google Cloud, and Azure.
Puppet’s Core Concepts
- Manifests: Written in Puppet’s domain-specific language (DSL), manifests are the files where the desired state of resources, like files or packages, is declared.
- Modules: A Puppet module is a collection of manifests and data, such as facts, files, and templates, grouped in a structured way. They are reusable chunks of code that allow you to apply specific configurations to your infrastructure.
- Puppet Master: This is the main server where configurations are managed and distributed from. Agents (nodes) fetch configurations from the Puppet Master.
- Puppet Agent: Installed on all servers (nodes) being managed by Puppet, the agent fetches and applies configuration from the Puppet Master.
- Facter: An independent tool within Puppet, Facter gathers basic information (facts) about nodes, such as hardware details, OS type, IP addresses, etc.
- Catalog: Once the Puppet Master compiles the desired state from manifests, it’s converted into a compiled format known as a catalog. The agent then applies this catalog to the node.
Why Use Puppet?
- Infrastructure as Code: Puppet uses a declarative language, allowing the infrastructure setup to be defined as code. This ensures easy versioning, repeatability, and scaling.
- Consistency: Ensures consistent configurations across multiple servers, reducing unexpected behaviors in different environments.
- Automated Provisioning: Automate tedious setup tasks, thus speeding up deployments and reducing manual errors.
- Extensibility: With a vast array of available modules from Puppet Forge, Puppet’s functionality can be extended according to specific needs.
- Reporting: Puppet provides detailed reports, allowing admins to view the actions taken on each node.
Puppet Versus Alternatives
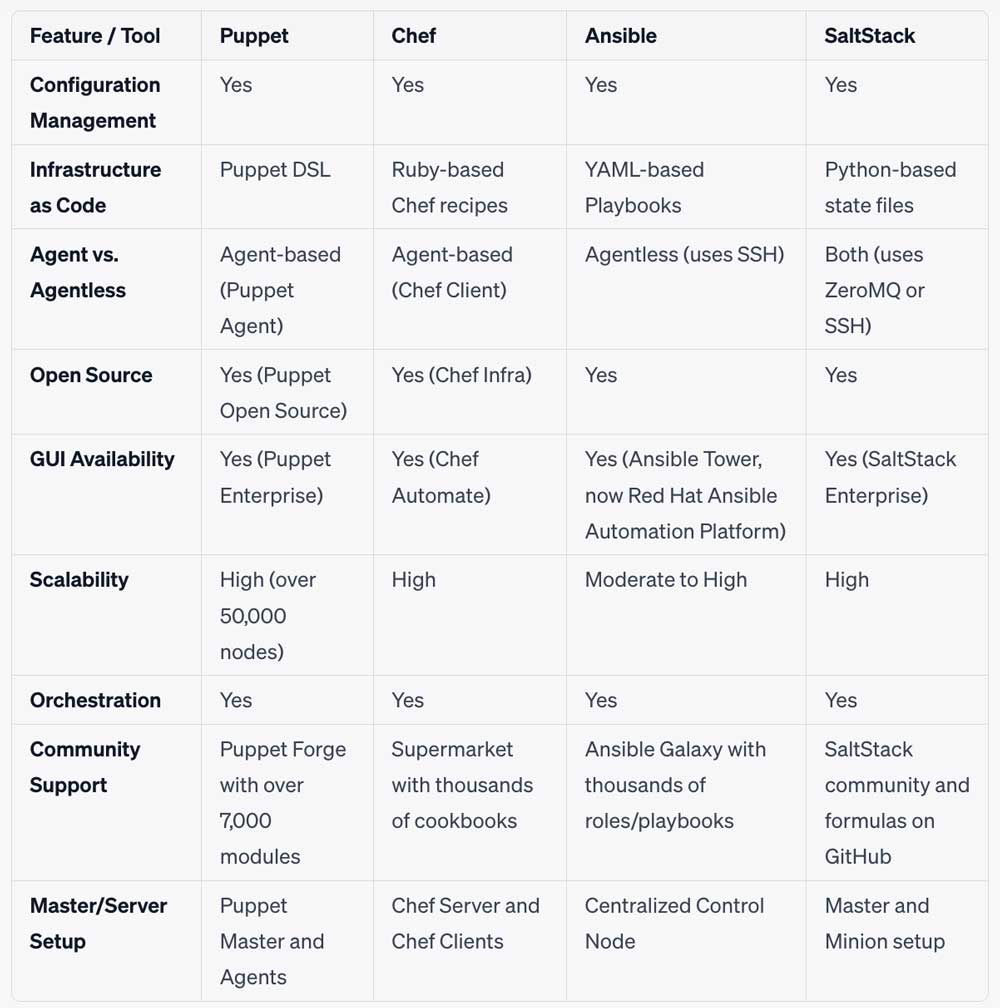
It’s easier to understand the benefits of Puppet by comparing to other tools that could be used as alternatives. The chart below compares Puppet to its closest alternatives: Chef, Ansible, and SaltStack.
Getting Started with Puppet
1. Installation:
Begin by installing the Puppet Master server on a designated machine:
sudo rpm -Uvh https://yum.puppet.com/puppet-release-el-7.noarch.rpm
sudo yum install -y puppetserver
For agent nodes, you’ll install the Puppet agent:
sudo rpm -Uvh https://yum.puppet.com/puppet-release-el-7.noarch.rpm
sudo yum install -y puppet-agent
2. Starting the Puppet Master:
sudo systemctl start puppetserver
sudo systemctl enable puppetserver
3. Configuring Puppet Agent:
On each agent node, update the puppet.conf file to point to your Puppet Master server:
echo -e "[main]\nserver=YOUR_PUPPET_MASTER_HOSTNAME" | sudo tee -a /etc/puppetlabs/puppet/puppet.confStart the agent and enable it:
sudo systemctl start puppet
sudo systemctl enable puppet
4. Establish Communication:
The first time an agent node runs, it sends a certificate signing request to the Puppet Master. On the Puppet Master, list pending certificates:
sudo /opt/puppetlabs/bin/puppet cert listSign the desired certificate:
sudo /opt/puppetlabs/bin/puppet cert sign AGENT_NODE_CERTNAME5. Creating Your First Manifest:
On the Puppet Master, create a manifest. For example, a manifest to ensure the installation of git:
package { 'git':
  ensure => installed,
}
Save this to a .pp file, then apply it using the puppet apply command or let the agent fetch and apply during its periodic run.
Puppet streamlines infrastructure management by treating it as code. It ensures consistency across diverse environments, allowing for more reliable and faster software delivery. By mastering Puppet, IT teams can harness the power of automation, reducing manual overheads and potential errors. Its integration into the broader DevOps ecosystem makes Puppet an invaluable tool for modern infrastructure management.