Vercel, formerly known as Zeit, is a cloud platform for static sites and serverless functions. It’s especially known for its user-friendly deployment process, real-time feedback, and tight integration with frontend frameworks like Next.js.
Intro to Vercel
Vercel, initially launched as Zeit, has swiftly become a cornerstone in the realm of cloud hosting, especially for frontend developers. Established with a mission to facilitate optimal developer experience, Vercel stands out for its tight integration with frontend frameworks, particularly Next.js. Embracing a serverless approach and offering instantaneous global deployments via its expansive Content Delivery Network (CDN), Vercel has witnessed significant growth since its inception. Its evolution is a testament to the evolving needs of modern web development, underlining its emphasis on speed, scalability, and streamlined workflows.
Vercel Quick Facts
Optimized for Frontend Frameworks: Vercel is designed with frontend frameworks in mind, especially Next.js. Its tight integration with Next.js provides a seamless development and deployment experience, making it a popular choice for frontend developers.
Serverless Architecture: Vercel emphasizes serverless functions, allowing developers to run backend code without managing a full server setup. This approach is aligned with the modern trend of decoupling frontend and backend, leading to more efficient and scalable applications.
Instant Global Deployments: With its global Content Delivery Network (CDN), Vercel ensures that applications are served from the nearest geographical location to the user, ensuring low latency and fast load times.
Developer-Centric Workflow: Vercel offers a real-time development environment with features like preview deployments from Git branches. This enhances the developer’s workflow, offering instant feedback and streamlining the continuous deployment process.
Competitive in the JAMstack Landscape: Vercel is a strong player in the JAMstack (JavaScript, APIs, Markup) paradigm, competing with other platforms like Netlify and GitHub Pages. Its developer-friendly toolset and performance optimizations make it a top choice for JAMstack applications.
Key Features of Vercel
Easy Deployment: With Vercel, deploying your applications is as simple as dragging and dropping or linking a GitHub, GitLab, or Bitbucket repository.
Serverless Functions: Vercel offers out-of-the-box support for serverless functions, which allows you to write server-side code without the need to manage a full server infrastructure.
Performance Optimizations: Vercel takes advantage of global Content Delivery Networks (CDN) to ensure that your application loads quickly for users all over the world.
Real-Time Feedback: During the development process, Vercel offers real-time feedback, making it easier to catch and rectify errors early.
Custom Domains: Vercel lets you add your own domains, and it provides automatic SSL certification for those domains for secure browsing.
Environment Variables: You can set environment-specific variables which are essential for configuring your application’s behavior during development, preview, and production stages.
Integrated Development Environment: Vercel is tightly integrated with Next.js, a popular React framework, but it also supports other JavaScript frameworks like Vue, Angular, Svelte, and Gatsby.
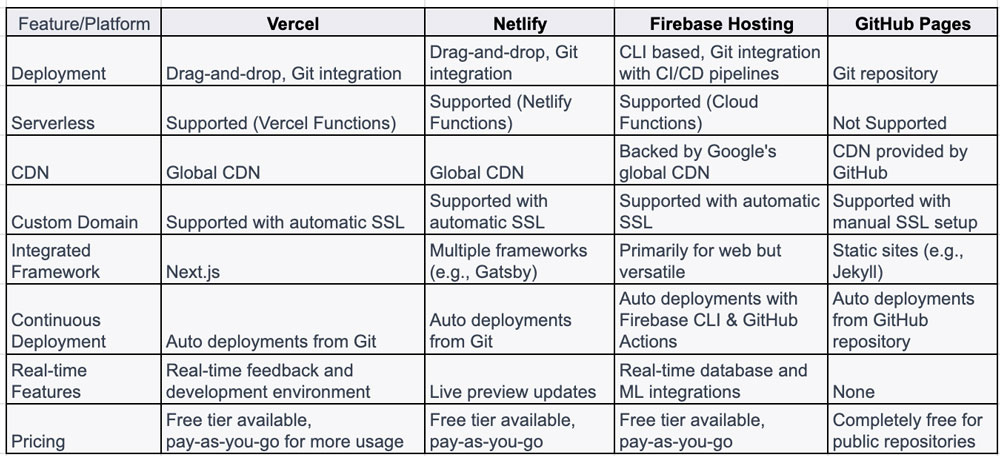
Vercel Versus Alternatives
It’s helpful to take a look at the features and pricing structure of Vercel compared to other cloud hosting alternatives. The chart below compares Vercel to three of its closest competitors: Netlify, Firebase Hosting, and GitHub Pages.
Getting Started with Vercel
Installation: Begin by installing the Vercel CLI (Command Line Interface). Open your terminal or command prompt and run: npm i -g vercel
Login to Vercel: After installing the CLI, you need to login. Run: vercel login
Deploying Your Project: Navigate to your project directory using the terminal. If it’s the first time deploying this project, simply run: vercel Follow the prompts. Once deployment is done, Vercel CLI will provide you with a live URL where your project is hosted.
Setting Up Serverless Functions: To create a serverless function, create a folder named api in your project root. Any file you place inside this folder will be treated as a serverless function. For instance, api/hello.js will be accessible at your-vercel-url/hello.
Linking to Git: For automatic deployments, you can link your Vercel project to a Git repository. Once linked, any push to your specified branch will trigger a deployment. vercel link
Environment Variables: To add environment variables, use the Vercel dashboard or the CLI: vercel env add
Production Deployment: After you’ve tested your application and are ready to go live, you can trigger a production deployment: vercel --prod
Assigning a Custom Domain: If you have a custom domain that you’d like to use, add it via the Vercel dashboard under the ‘Domains’ section or using the CLI: vercel domains add your-custom-domain.com
Vercel offers a seamless hosting and serverless backend solution, especially for frontend developers working with popular JavaScript frameworks. Its emphasis on simplicity without compromising on performance makes it a go-to choice for modern web applications.